

When it comes to building a mobile-friendly, functional, and great website quickly, you are required to select the right Content Management System (CMS) on the vital basis. There is a lot of CMS out there such as WordPress, Joomla, and Drupal. Depending on your business, it should be your decision to choose the perfect CMS. But there is nothing easier than building a website using WordPress. Here you learn how to create a website using WordPress with a super easy and hassle-free way.

In the present era, it is vital to have a website either you have a large business or a small organization. No matter whether you are running your business online or offline, a website is required to give your business a go. Keeping this in mind, every business owner needs a website.
When it comes to building a business website or a personal blog, it may sound terrifying if you are not tech-savvy. Most of the business owners don’t move forward-thinking of the time, energy and most importantly money to make this happen. But with the help of today’s easy-to-customize website builders like WordPress, an inefficient person like you can create a website within hours. The only thing you need is a proper guideline for building a website.
Today, I am going to provide a step by step guide to create a website using WordPress and bring your business online. Once you are done with this tutorial, you will have your website up and running.
Table of Contents
How To Create A Website Using WordPress CMS?
Let’s start off with the overview of the steps in this article:
- What Is A Content Management System?
- Why Should You Go With WordPress CMS?
- Register A Domain Name
- Choose The Right Web Hosting Service
- Where to Buy the Best Hosting and Domain Name?
- Install WordPress
- Select A Perfect Theme
- Add Page and Post To Your Website
- Install Essential Plugins
- Customizing Your Website
1. What Is A Content Management System?

Before we start the fun part of this content, let’s understand what is a Content Management System? Content Management System (CMS) refers to a mechanism or a platform of sorts that allows you to create your content and publish in on a website. For example, it is possible to create a number of administrative users in WordPress where each one has various privileges.
CMS consists of 2 components. The first one is a Content Management Application (CMA) and the other is a Content Delivery Application (CDA). CMA refers to the graphical user interface which allows a user to create, remove, or modify content. Content Delivery Application actually responsible for the back-end procedures that manage and deliver the content when it is in CMA.
CMS is a kind of software that comes with your host’s server. After finishing the installation process of your hosting, you can install the software with a single click. Once the software is installed, it will allow you to add text, photo and other content on your website. A CMS allows you to install the perfect theme that suits your business. With the template, you can improvise the appearance of your site, add plugins and functions.
When it comes to CMSs, the 3 real giants out there are WordPress, Joomla, and Drupal. All of them are open-source and free. All the platforms have developed their systems using PHP. No other systems can’t compete with these 3 when it comes to simplicity, usability, size of the community, availability of free products and maintainability. They offer to create a gorgeous looking website using plenty of customizing options. These content management systems are suitable for those who aren’t good at development and programming.
2. Why Should You Go With WordPress CMS?

There was a time when most of the sites were built using CSS, HTML, and Flash. The process was too complex and required a lot of time to create a website. Also, it was not possible to give it a professional touch without the help of professionals.
Therefore, most business owners still think creating a website requires a lot of programming and design skills. Moreover, they become frightened thinking that they would have to invest a thousand dollars in the expert. But this thinking is no longer true.
Today’s easy-to-customize content management systems have made building a professional website accessible to every individual. Using the right CMS, you can simply create your own website without having extensive knowledge of programming.
According to W3Techs, WordPress is the leading Content Management Systems out there. Today, 55% of all websites are powered by WordPress which is really incredible. Their innovative technologies and user-friendly features have made them the most popular CMS. The rest of the sites are powered by Drupal (11%) and Joomla (20%).
WordPress is very easy to install. Most hosting providers out there offer a one-click installation of WordPress. It has a large network of both professional developers and beginners. You can easily join the strong community where you will get help with all your website issues. WordPress has the biggest repository for Free and Premium Themes, Templates, and Plugins which you can use to leverage your site.
Regarding the support service, WordPress offers endless support. WordPress is ideal for them who are not tech-savvy. The features are simply straightforward and intuitive to use. Installing WordPress and configure the system is super easy and the tools you will need further are smooth to manage. There is no shortage of features to create a website using WordPress.
3. Register A Domain Name

Once you have set up your mind going with WordPress CMS, it’s time to move forward to the next step. Now it’s time to start thinking of getting a domain name. A domain name is something that can highlight your business to the visitors. So, you have to choose a domain name in such a way so a visitor can easily understand your business at a glance.
A domain name can be your name.com, yourbusiness.com, yourcompanyname.com, or something similar. Getting the perfect domain name is crucial. When you are about buying a new domain, consider a few things. Always try to choose a shorter name for your website. The shorter your domain name is, the easier it is to remember and type as well.
Next, pick up a name that presents your business clearly. If you have a specific niche, then identify the right keywords and try to get a closer domain name according to your niche. This will help your website get better search engine ranking.
Now, there are plenty of domains out there such as .com, .net, .es, .org, .eu, .biz, .us, .info, .fr, and so on. You must be overwhelming to go with the right one.
What am I suggesting? Always try to go with the .com domain.
Why?
Because when most people think of a domain name, the first thing that comes into their mind is a .com website. It is the most popular extension. However, if the desired name is not available with .com, you can go with .me or .net.
4. Choose The Right Web Hosting Service

After you are done with the domain name, it’s time to think about choosing a reliable web hosting service. A hosting provider is something that offers you put your website in their place. With the powerful servers, the hosting provider will host your website, let people know and allow them to access your site. The better your hosting provider is, the better service you will get.
To be specific, the performance and functionality of a website largely depend on a web hosting provider. As a business owner, you will never expect your website goes down for a while. For better customer interaction, your website should always up and running.
Keeping this in mind, you need to select a hosting provider that ensures maximum uptime, excellent customer support, and superb performance. There are several web hosting providers out there that offer different types of hosting plans. Most of them come with:
- Shared Hosting
- VPS Hosting
- Dedicated Hosting
- Cloud Hosting
Except for Shared hosting plan, VPS, Dedicated, and Cloud Hosting costs a lot of money, which can’t be afforded as a beginner. I always recommend a shared hosting plan as it is inexpensive and suitable for business startups. Shared web hosting offers plenty of room to grow at an affordable price. As long as your business size is small, stick with the Shared hosting plan. I will suggest upgrading to a better plan when your website starts to gain thousands of visitors per day.
5. Buy Domain Name and Hosting
You already know how to choose a domain name and choose the right hosting provider. Here comes the big question, what is the best place to buy a domain name and hosting? There are several resources out there where you can purchase domains for your website.
Some of the leading sites to purchase domains are GoDaddy, NameCheap, Google Domains, etc. Some big names for web hosting services are Bluehost, SiteGround, etc.
Should you buy a domain and hosting service separately? Of course not. Doing this will suffer you a lot. Whenever you have issues with your website, you will need to contact the domain and hosting provider several times and wait for their response. This may result in wastage of your precious hours.
So the best solution is to go with the company that offers both domain and hosting services. Although the number is not less, I prefer Bluehost for their cost-effective price and relentless service, and innovative solutions.
Thankfully, the company is offering only $2.95 per month for a web hosting service. If you go with the plan, you will get a domain that is absolutely free, free SSL certificate, one-click WordPress installation and 24/7/365 support from their agents. Where else can you get all these facilities together?
So, isn’t it the best choice to go with this awesome company? Let’s get step by step tutorial to register a domain name and buy a hosting service.
Step 1
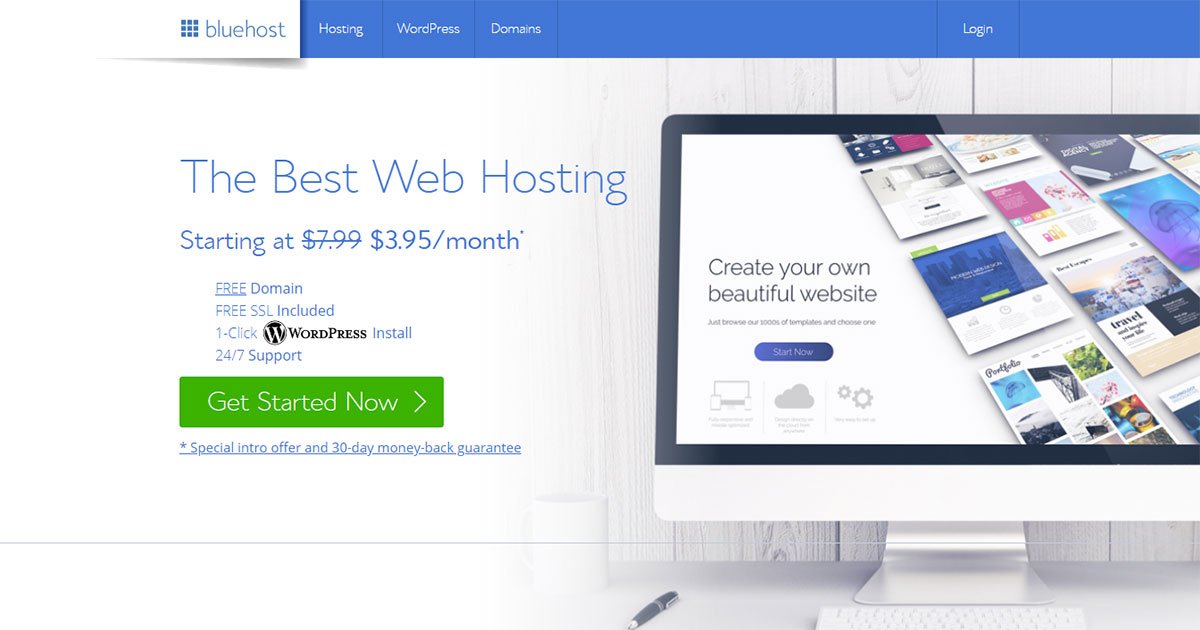
First, go to the Bluehost website. The website will be appearing as above. Now, click on the “Get Started Now” button. By clicking on the button, you will be taken to the next page where you will see the hosting plan.
Step 2

On the next page, you will see the hosting plans and features they are offering. Although you can select the basic, plus, or choice plus your own, I would suggest going with the basic plan. The plan is the best for new businesses. While the other two plans come with advanced facilities, but I don’t think you need all the features at first unless you start receiving thousands of visitors for your website.
Before proceeding, double-check the features so you can be sure of the advantages you are going to receive. Click on the “select” button and move forward.
Step 3

On the next page, put your desired domain name in the “new domain” box. Follow the guidelines above to select a domain name. If you are still overwhelmed by thinking of your domain name, you can choose it later. If you already have an existing domain name purchased from another resource, put the name in the next box. Once you are done on this page, click on the “next” button.
Step 4

It is very possible that your desired domain name already purchased by another user. With the growing number of online businesses and websites, the simple domain names (e.g. business.com, restaurants.com, etc.) have long gone. If you see this happen, try to type another name closer to your business and proceed.
Step 5

Here, you will need to fill-up the form to proceed. It will take less than 5 minutes to complete the form. Just put the accurate information as you are about to billing on this page.
Step 6

After filling out the account information, scroll down the page to go through the next options. Here, you have to confirm what you are purchasing and how much you are going to charge. As there is no turning back option, so pay special attention to the “Account Plan“, and the “Hosting Price” option. Make sure the amount is okay according to your selection. With the “package extras” option, you can either “tick” all the boxes or “unselect” them all. The option includes extra features. Though the features are not mandatory at first, in case you need the features, click on the box to purchase that.
Step 7

Next, put the payment information for billing. Enter your credit card number and the other required fields. Once you are done, double-check the whole page to make sure everything is correct. Then, click on the small box marked above and press the “submit” button.
So, you are done with registering a domain name and web hosting service. Now it’s time to play with the website builder, themes, plugins and features to create a professional website.
6. Install WordPress
After complete purchasing, you will be forwarded to the Bluehost dashboard. Now it’s time to install WordPress. Thankfully, Bluehost offers a 1-click installation of WordPress so you can install the CMS within minutes.
Step 1

In the dashboard, look for the “Install WordPress” button and click on the icon marked above.
Step 2

On the page, click on the green “Install” button and move to the next page.
Step 3

On this page, you can decide whether you want to use your website including www. (www.yourdomain.com) or not (yourdomain.com). Actually, it is not a major issue to include www.or exclude it. Simply enter your domain name and click on the “check domain” option.
Step 4

When the next page appears, fill up the box with Site Name or Title, Admin Username, Password, tick the small box and click on the “Install Now” option. WordPress installation is now on the way and it will take less than a minute.
Step 5

When the installation is complete, click on the “View Credential” option to view the login URL and required login information to log in to your WordPress website.
Step 6
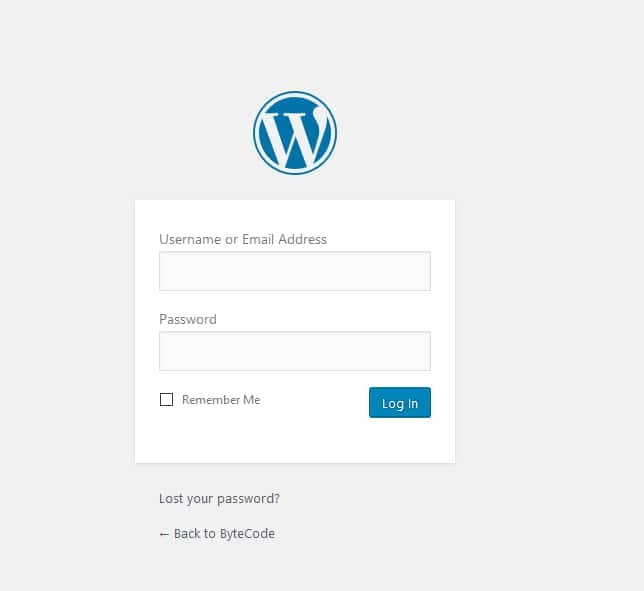
Type www.yourdomain.com/wp-admin in your browser’s address bar. Enter your username/Email address and password with the information that was shown on the last Bluehost dashboard’s page. On the next screen, get into the dashboard of your WordPress website builder. It’s time to play!
7. Select A Perfect Theme

After logging into your WordPress website with the credentials, you will be taken to your website dashboard. WordPress dashboard simply looks like the above image. There is a lot of stuff to play with. You will see 3 main sections here.
Let’s understand the sections
- On the screen, you will see a toolbar at the top. This section has administrative functions and resources. Once after customizing your website, you will see several options here like Theme Options, Cache, Updates, Customize Theme, New Comments, etc. In the upper right corner, you can see the name you have logged with. From this section, you can have important information and notification of your website at a glance.
- On the screen, you will see the Posts, Media, Links, Pages, Comments, Appearance, Plugins, Users, Tools, and Settings options on the left side by default. Using these options you can design, develop and customize your website.
- This section is the main work area of your website. It will suggest you with the resources to make your website better, inform you about the latest WordPress, Plugins, and Theme update, your site’s stats, comments, etc. If any issue occurs with your website, you will be notified here with the issue details and probable solutions.
Now the fun part begins. You are now all set to develop, design and customize your website. And the first task is selecting a perfect theme according to your business niche. Once you have installed WordPress, you will get access to thousands of Free and Premium Themes. Based on your business requirement, you can choose whether a Free theme or go with the paid version.
Ultimately no one understands your business better than you. So it should be your decision about which theme to select for your website. I have said once that WordPress has something for every business category. So when it comes to choosing a theme, there is nothing to worry about. Just follow the steps given below. I believe you will be able to select the perfect template.
Step 1
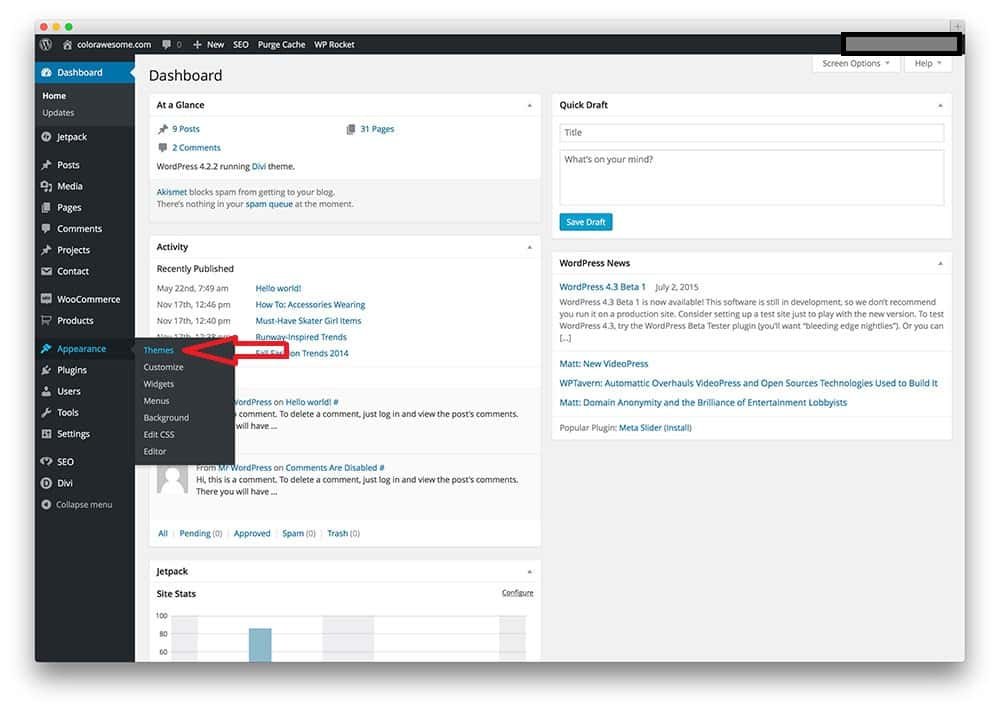
First of all, go to the Appearance option. If you put the cursor on it, you will see several options there as marked above. From there, click on the Themes option. These options will be shown as a drop-down menu when you click on the Appearance rather than just put your cursor on it. No matter how the options can be shown, you need to click on the themes option to proceed to the next page.
Step 2
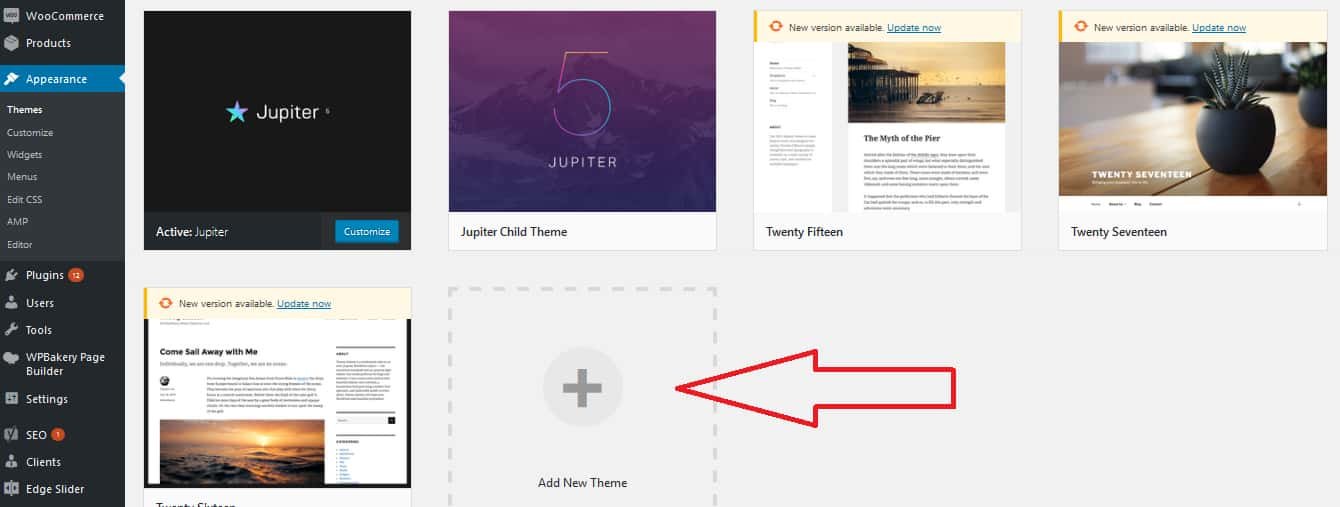
The next page will show you the top 5 featured themes of WordPress. You can select a theme among these 5 or click on the Add New Theme to get access to the rest of the popular Free and Premium Themes.
Step 3

See they have over 6,000 latest themes that can be used for various website purposes. You can sort the items by popular, latest, featured and the other filters. All the themes come with different features, functions and customizing options. Each of the themes is specialized for a particular niche. You can scroll down the page until you find the template that meets your requirements. If you already have the name of a theme, you can search for it writing in the search box. It will save you precious hours.
Step 4

Once you find a theme for your website, check the theme details first and go through the features to know what it is offering. Always go with the theme that comes with incredible features, device responsive, super-fast, and offers plenty of customization options. If the Free themes don’t meet your criteria, don’t hesitate to purchase a Premium theme. The Paid template offers more advantages and facilities than Free products. Before installing, click on the Preview option to see how your website will look like if you finally install the theme. If everything goes well, then install the selected themes and see the magic!
Step 5
If you can’t find a template at all, there are several marketplaces out there where you can get great WordPress themes.

After getting the perfect theme from a marketplace, upload it to your WordPress website and install it by following the steps above.
Step 6

After installing a theme, move to the next options from the drop-down menu. From the Customize option, you can make any changes to the installed template, edit the page title, tagline, change header menu, footer information, etc. according to your business. With Widgets, you can add certain functions that make your website more professional. Menus are much important for any website. It will allow you to navigate your site and contents. You don’t need to go with the Edit CSS and Editor option at first. However, if you need additional changes to the template, you can go with these.
8. Add Page and Post To Your Website

If you are done with the template, it’s time to design your webpage with your product and service. As a business owner, your main focus should be reached to the targeted audiences and make them purchase your product. To make this happen, you need to design your webpage with attractive design, user-friendly features, and informative content. You can do this by either adding service/product Pages or creating Posts.
Your website may contain Home, About Us, Service, Product, Contact Us, etc. pages. With the pages, you can let the visitors know about your company, list your products, highlight your services, provide contact information, etc. with proper information and images. Let’s see how to add pages to your website.
Step 1
Click on the Page option from the left and then click on the Add New button. You will be taken to the next page where you can start adding pages
Step 2

The next page will allow you to add new pages. Simply start by entering your page title in the box. It can be Home, About Us, Product, or anything according to your business. There is no such obligation that you should use only these Titles. Titles can be anything based on your business category. If you don’t add the Home page to your website, no one will blame you.
Step 3

Now start adding content in the text editor above. You can either copy/paste the unique content here or by writing on the box. By clicking on the Add Media option, you can add images to your content. But make sure that you have uploaded the images before adding content. You can format the content according to your own style using the formatting options. Besides adding images, you can also embed videos, upload audio files with the content.
Step 4
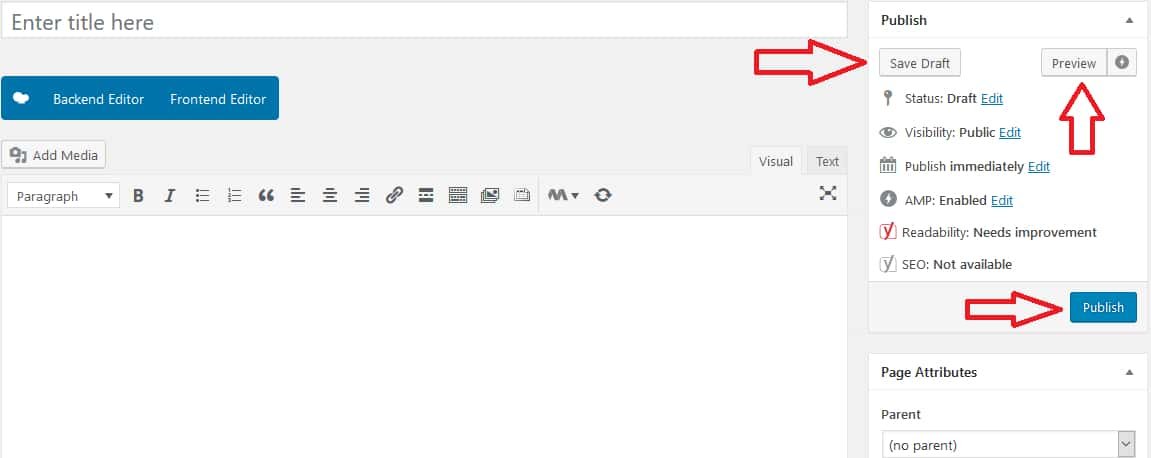
You can save the page as a draft to publish it later. If you want to work more with your webpage and add more content later then you can click on the Save Draft button. Before publishing, you can Preview it to make sure the webpage is looking exactly the same as you are expecting to. If everything is okay, Publish your first page and move to add more pages to your website.
Step 5

After creating the main pages, you can add more pages under the main menu. So now it’s time to add the additional pages to the menu. For this, click on the Menu button from the Appearance option. Then add your page to the desired menu by clicking the checkbox and simply click on Add to the Menu option. Very simple, isn’t it?
Adding posts is the same as adding pages. If you have a blog on your website, posts will be shown there. Let’s see how it works.
Step 1

Click on the Posts option and select the Add New from the drop-down option. Now enter the post title, add content, image, video and other files. Remember, this is your blog post title. So, the title needs to be eye-catching to grab the visitor’s attention. However, proceed to the next step.
Step 2

Now publish your post by clicking on the Publish button.
Step 3
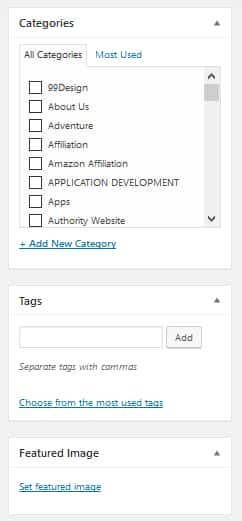
The difference you will see here is that you have Categories, Tags and Featured Image options here which are not available in the Add Page section. Here, you can categorize or add tags to your post to group similar contents. Also, you can add Featured Image with your post that will be shown with the post title on the main blog page.
9. Install Essential Plugins

Plugins are the extensions that expand a website’s capabilities, add more features and functions that don’t come built-in. Effective plugins can take your website to the next level and allow the visitors to browse your website with ease. With the right set of plugins, you can get a lightweight website, ensure your site’s security, increase site’s performance, boost search engine ranking, monitor your business growth, and more.
There are more than 47,000 free and premium plugins in WordPress to date. Although all of them are not necessary for your website, you need to install essential plugins. Below I am listing 5 plugins that you should install on the foremost basis. Thankfully, all of them are free and the installation process is super easy.
- Akismet: To keep your website safe from spamming
- Jetpack: One Stop Solution that ensures website security, performance, traffic growth, improves website appearance together.
- W3 Total Cache: Increase your page loading speed and ensures superb performance.
- Yoast SEO: Makes your website search engine friendly and boost website ranking.
- Contact Form 7: To connect with the customers and better engage with them.
Let’s install the Akismet plugin.
Step 1

From the “Plugins” option, select “Add New” button. The next page will show as above. It’s great that WordPress tells you about the featured, popular and recommended plugins and is offering you to choose any of the plugins from there.
Step 2
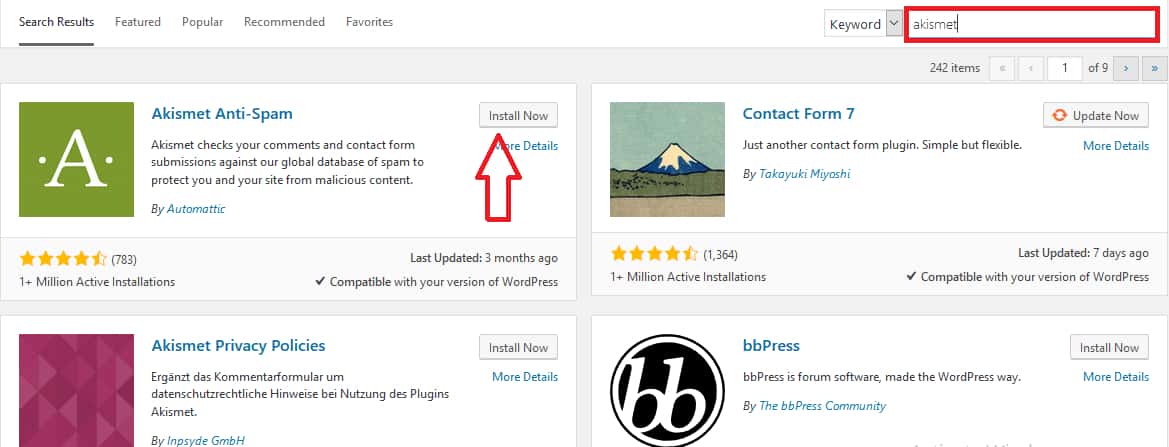
Write “Akismet” in the box. You see the page is showing the plugin you have searched. It shows how many users have installed it, the user’s rating, compatibility, and the date when it was last updated. Akismet has millions of active users with superb customer ratings. Additionally, you see some other plugins here that are recommended by WordPress. You can install them later if you want. However, move to the installation process of Akismet. Click on the “Install Now” button.
Step 3

It will take a while to install the plugin. Once the installation is completed, you need to click on the “Activate” button.
Step 4

Good news, Akismet plugin has been activated! Once the plugin is activated you don’t require additional tasks to do with it. It will take care of your website from now.
Installing the other plugins is the same as Akismet. After installing a plugin you can deactivate and delete a plugin anytime you want.
10. Customizing Your Website

Let’s introduce the customization options of WordPress to present your website in a more professional way. WordPress comes with several settings options such as General settings, Writing, Reading, Discussion, Media, Permalinks, Privacy, Google Analytics, WP-SpamShield, and Sharing. All the options here aren’t necessary to customize. Let’s see the procedures of the important sections here.
General Settings

From the General settings, you can change your webpage Title and Tagline. The Title explains to the visitors what your website is about and tells the search engines to rank your website for that niche. Tagline comes after the page Title across every page.
To edit your web page’s Title, Tagline clicks on the General option. On the next page write your website Title and Tagline. Also, you can choose what your website address will be.
Reading Settings

The options here say it all. To show your home page with a static page, select the A static page option. Decide how many blog pages should show at most. Simply keep the number at 10.
Discussion Settings

Generally, when you publish an article, people will express their opinions. The comment section is great for better customer engagement. But there are lots of spammers who post generic comments and Sammy links in the comment section. If your article receives plenty of spammy comments, it will get penalized by search engines. And ultimately you will lose your website. Thankfully, the Discussion settings allow the users to manage the blog post comments. To keep your comment section spam-free, tick on the box that is shown above.
There You Go
If you have followed all the instruction above, by the time you should have a website which is fully functional. See the entire process wasn’t tough, was it?
Now your website is ready to go and you can start your business with it. Additionally, don’t forget to ensure the website’s security and update the features whenever available. So what are you waiting for? It’s high time to create a website using WordPress.