

You have heard a lot about WordPress. It is one of the most popular CMS (Content Management System) out there, has the biggest repository of templates, plugins, and very smooth to use. The platform is the fastest growing and most widely used content management system which is constantly evolving. You heard them so well that you decided to create your own website or personal blog using WordPress. But the problem is you are not much acquainted with WordPress CMS and don’t know how to set up WordPress.
So should you be sitting idle without implementing the CMS to create your own site? Of course not. It’s time to be familiar with the most amazing CMS and start building a professional website. Today, I am going to show you how to setup WordPress yourself.

Whether you want to create an e-commerce store, blog, or other types of website, WordPress is a superb choice. When it comes to both design and functionality at a time, WordPress is super flexible.
Thankfully, creating a website using WordPress isn’t rocket science. You can set up WordPress within an hour and start adding content to it immediately.
Now you may ask why there are plenty of methods to install WordPress?
The answer is pretty simple. Because of the immense popularity of WordPress, there are a number of helpful installers to setup WordPress. Therefore, installing WordPress is no longer limited in only one way.
Due to the comprehensive ways to build your WordPress website, you may be overwhelmed with how to get started. Relax, in this comprehensive guide, we will walk you through the complete steps on how to set up WordPress so that you can build a WordPress site from scratch in your own way.
Table of Contents
How To Setup WordPress?
As I have said a second before, you can install the WordPress content management systems on your hosted server in various ways. Although, most of the web hosting servers come with one-click installation, what will you do if you don’t have the advantage?
In this case, I recommend setting up WordPress manually as it is more secure than the other methods.
Also, you can create a local WordPress environment using XAMPP. Let’s get familiar with these two methods and learn how to setup WordPress efficiently.
Install WordPress Manually
Instead of using one-click installation and other methods, knowing how to setup WordPress manually is a great way to learn more about how the CMS works. Although it sounds tough, if you go with the manual installation process, you will understand the whole process. Besides, it will be handy for you to make any changes with your hosting further.
Additionally, you can’t help going with manual installation if the existing hosting provider doesn’t have the single-click installation feature. When it comes to installing WordPress manually, either you need an FTP client or you can use the file manager in the control panel of your hosting account.
Both of the processes require uploading the zip file, although there is a little difference between them. The first one (FTP) is a desktop application while the other (cPanel) is a web application. However, we will cover both methods here.
How To Setup WordPress Using FTP
Generally, FTP stands for File Transfer Protocol which refers to a standard network protocol. I prefer using FTP client as it has several advantages such as it helps to make local backups of your website. Among the plenty of FTP clients out there, you can use FileZilla to upload your files effortlessly.
If you need an FTP for your Mac, you can try Cyberduck, which is completely free to use. However, with FTP clients, you need to follow a few simple steps to install WordPress.
Before setting up WordPress, ensure you have the following:
- FTP Access to your hosting server
- FTP client
- Web browser
- Access to your hosting account
In order to get the access information, you need to log in to your hosting account or contact your web hosting provider to provide you with the FTP server details. Additionally, you can read this post on how to use an FTP client like Filezilla to access to your web hosting server.
Now, I assume you have all the above components. Now go through the following steps properly for a successful WordPress installation using Filezilla.
Step 1
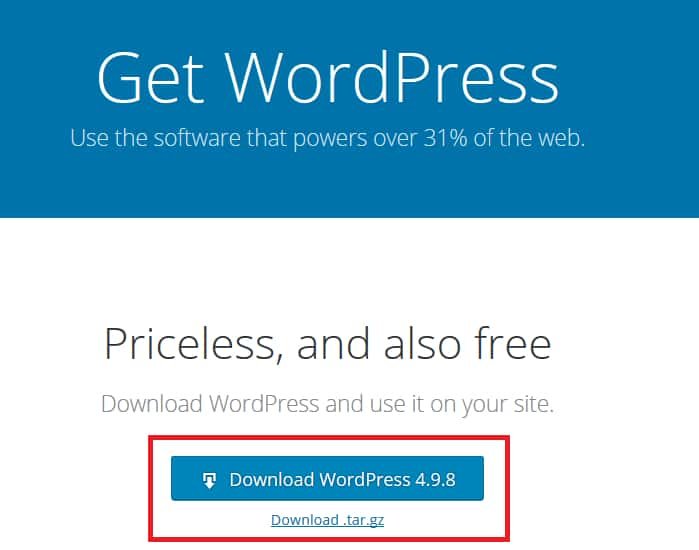
First, you need to download WordPress to begin. Click on the Download WordPress button to get the latest WordPress version. Save the zip file to a place so you can find it easily when uploading.
Step 2

After downloading, it’s time to upload the files to your FTP. To do this, unzip the WordPress files on your computer. Then log in to your FTP client with the FTP server URL, username, and password. Next, upload the unzipped files to the exact directory in your hosting account.
Step 3
Next, you need to create a database and database user. Most of the web hosting provider comes with a database. If your hosting doesn’t provide a database, then you need to create one yourself. If your host uses cPanel, go to the Database section, click on the MySQL Database and create a new database.
Regarding creating the database user, you will need to know the database name, hostname, username, and password. After completing the process, simply complete the WordPress 5-minute installation wizard. I have detailed the complete WordPress installation process below. After installing WordPress CMS successfully, you are ready to create your own WordPress website.
Setup WordPress Via cPanel
The second method is to upload files directly into cPanel. Some web developers claim this process is relatively easy as it’s accessible from any browser and the method doesn’t require software downloads and relevant hassles.
To proceed with this method, ensure your website is connected to WordPress CMS via your host. Locate the Site Builder option in your web hosting account and select Use WordPress to add your domain to WordPress.
Now follow the below steps to set up WordPress.
Step 1

First, log in to your cPanel and go to the File Manager in the file section. On the next screen, click on the public_html option to find the directory you want to use.
Step 2

Click on the upload option and select the WordPress zip file. Once the upload is complete, click on the Go Back option. To extract the files, select WordPress and click on the Extract option above.
Upon clicking, you will see a popup asking to specify the location. You can leave this as the default directory and unzip everything inside the zip file.
Step 3

See, you have a WordPress folder in the directory. Click on the folder and access the internal files. Now select all the files and move the entire files to the main root. For this, remove the WordPress section from the file path and click the Move Files option. Finally, delete the WordPress and zip folder from the directory.
Congratulations! You have completed WordPress installation via cPanel. And here the part ends on how to setup WordPress manually.
Setup A Local Environment For WordPress
Besides setting up WordPress manually, you need to know how to setup WordPress for a local environment. Let’s see how to setup WordPress on your local environment.
Creating local WordPress sites is a common practice among site owners and developers. The practice allows you to test WordPress CMS without building an actual website online.
As open-source software, most of the tasks of WordPress are public. That means when you update your website on a regular basis, everyone can easily see the changes. The issue arises when you make a mistake.
If anything goes wrong with your editing, your customers with the website may be affected which is totally unexpected. Even the smallest issue with the design or content results in the biggest problem to hide the mistakes from everyone, you need to set up a local WordPress development environment where you can do anything without any hassle.
The local website is only visible to you. When you implement a local WordPress environment, it allows you to test your site’s features and functionalities safely in a private mode.
Thankfully, if you already have a WordPress site still you can create a local copy of your site on your PC.
How To Setup WordPress For A Local Environment
In order to run WordPress locally, you require to install a web server software (Apache), MySQL, and PHP on your computer. MySQL refers to database management and PHP is a programming language. Both of the components are essential to establish a local environment for WordPress.
If you already have phpMyAdmin which is a MySQL user interface, you will find using the database more convenient. Additionally, you need a code editor for the coding part.
There are several software out there to set up local server environments. Some of the most popular software are Vagrant, XAMPP, DesktopServer, LocalbyFlywheel, etc. to perform the task.
Now, which one do I prefer? Well, I recommend using XAMPP.
What Is XAMPP?
The abbreviation for XAMPP is cross-platform, Apache, MySQL, PHP, and Perl. Most web developers use the application to establish a local environment. You can use the platform both on Windows, Osx as well as Linux. Let’s dive into the details of setting up the WordPress CMS on a local environment.
Step 1

First, download XAMPP for your operating system. After getting in there, download the pack depending on your operating system.
The software is completely free and it is very easy to install Apache distribution, Perl, and PHP. The entire package is incredibly smooth to set up and use.
Step 2
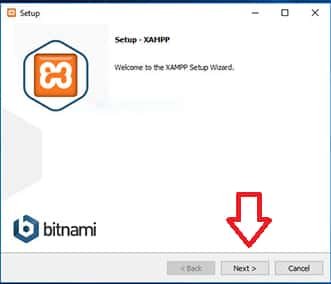
After downloading, click on the run option. A setup wizard will be appeared to proceed with the installation process. From there, click on the Next button.
Step 3
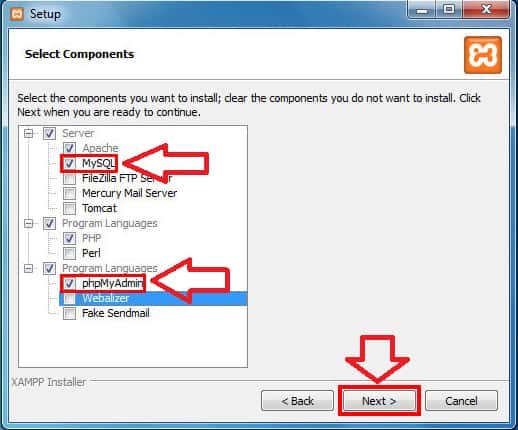
On the next screen, you will see the above elements. By default, all the elements are selected automatically. You can either keep all the components marked or uncheck the elements that you don’t need to use.
When you use XAMPP to establish a local WordPress environment only, just check the Apache, MySQL, PHP, and phpMyAdmin box only. After clicking on the next option, the wizard will ask where you want to place the software. Once you specify the place, the software will install within a few seconds.
Step 4

After completing the installation, open the control panel. There, you will see Apache and MySQL are turned off. Click on the button to start the modules.
You may see an alert from Windows Firewall. If you see the notification click on the Allow Access button to run XAMPP on your computer.
Now, the software has been successfully installed on your computer and you are ready to set up the WordPress platform.
Step 5

The next step is to create a database in your MySQL interface. To do this, click on the Database tool in the phpMyAdmin interface and create a database. When creating the database, you can use any name according to your choice.
Step 6

Next, you need to download the latest WordPress version. To download WordPress, follow the methods that are detailed above.
Once after download, extract the zip file. Mind that you need to extract the file at C:/program Files/XAMPP/htdocs if you are using a Windows operating system. If you are on a Mac, unzip the file in the /Application/XAMPP/htdocs folder. This will help you identify your local site easily.
Step 7

Open a browser and copy-paste the URL http://localhost/wordress to initialize the actual setup of WordPress. Next, click on the Let’s go! option. The next page will ask you to select a language.
Obviously, you select English to use the platform smoothly. However, if you are not comfortable with English (which is a very rare case), you will find hundreds of other languages there. Simply choose the language that is comfortable with you.
Step 8

Now you need to fill the blanks with proper information. Enter the exact database name that you have used in MySQL interface. Always use root as the username and leave the password field blank. Type localhost in the Database Host box.
Generally, you will find the Table Prefix box previously filled with wp_. Leave the box as it is. You need to change this only when you want to run multiple WordPress installations. However, click on the Submit button below and move to the next step.
Step 9
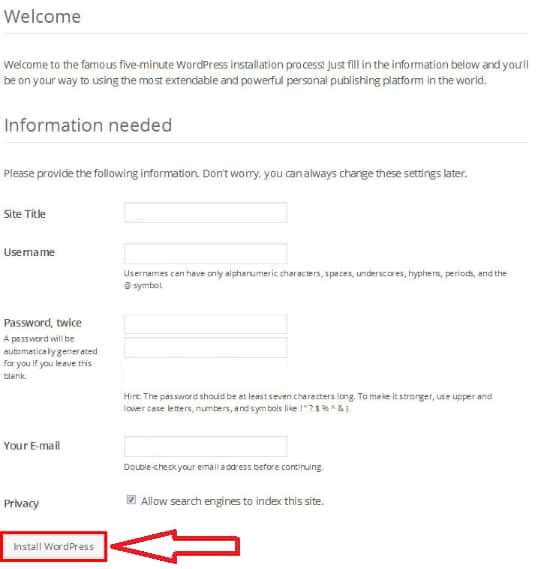
It’s time to create a username and password for your WordPress account. Type your site title, username, password, and your Email address. I always advise using a strong password which will ensure your site’s safety.
After filling all the information, click on the Install WordPress button and that’s it. You have successfully installed WordPress and you are on the way to use WordPress in a private mode.
Step 10

Now that you have established a local environment for WordPress using XAMPP and you can work on it in a private mode without changing anything on your live website.
In order to login to the dashboard, type http://localhost/website1/wp-admin on your browser and use the login credentials you used during installation.
How To Setup WordPress – Conclusion
If you have come to this far, then you are on your mark to setup WordPress yourself. It’s now a piece of cake. You have learned how to set up WordPress. Knowing how to set up WordPress using a software or a plugin gives you additional advantages when it comes to creating a professional website.
You are now one step behind building a successful website for your business. WordPress is inviting you to create a professional site using its stunning templates and incredible features.